写在前面 鉴于有人留言说想要学习SpringBoot相关的知识,我这里打算写一个SpringBoot系列的相关博文,目标呢是想让看了这一系列博文的同学呢,能够对SpringBoot略窥门径,这一系列的博文初步都定下来包括SpringBoot介绍、入门、配置、日志相关、web开发、数据访问、结合docker、缓存、消息队列、检索、任务安全、分布式等等一系列的博文,工作量很大,是个漫长的过程,每一步我都尽量详细,配上截图说明,也希望对看的同学真的有用。单纯就是想分享技术博文,还想说一句就是,如果觉得有用,请点个关注、给个赞吧,也算对我来说是个宽慰,毕竟也得掉不少头发,嘿嘿嘿
系列文章传送条 详细SpringBoot教程之入门(一) 详细SpringBoot教程之入门(二) 详细SpringBoot教程之配置文件(一) 详细SpringBoot教程之配置文件(二) 详细SpringBoot教程之日志框架 详细SpringBoot教程之Web开发(一) 详细SpringBoot教程之Web开发(二) 详细SpringBoot教程之Web开发(三) 详细SpringBoot教程之数据访问 详细SpringBoot教程之启动配置原理 详细SpringBoot教程之缓存开发
默认访问首页 开始正式讲解之前呢,先把整个过程的项目源码贴出来,方便边看边学项目GitHub地址 ,然后我们在讲解的过程中还会用到Thymeleaf相关语法,可以边打开我的另一篇博文当参考手册,直接点击那篇博文的目录,可以快速导航到对应语法的示例,模板引擎Thymeleaf?来这一篇就够用了
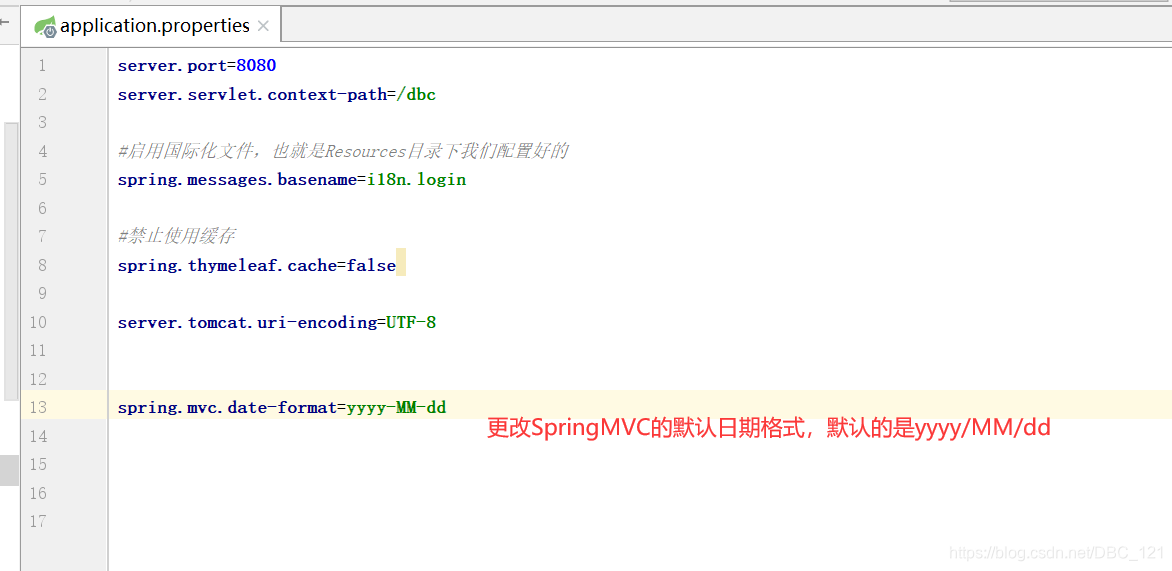
接上一篇博文创建的项目,我们先在properties配置文件中添加一个这个配置
1 2 server.servlet.context-path=/dbc
意思是应用的上下文路径,也可以称为项目路径,是构成url地址的一部分。也就是说server.servlet.context-path不配置时,默认为 / ,如:localhost:8080/xxxxxx。当server.servlet.context-path有配置时,比如 /dbc,此时的访问方式为localhost:8080/dbc/xxxxxx,这样我们就配置好了默认首页路径。
国际化 接着我们再来编写国际化配置文件,在SpringBoot中使用ResouceBundleMessageSource管理国际化配置文件,如果在放在以前的SpringMVC中,我们使用了ResouceBundleMessageSource之后,需要在页面中使用fmt:message取出国际化配置文件,我们我们在SpringBoot中就当然不需要这样来写啦,哈哈哈。在SpringBoot中怎么使用呢,具体步骤如下
第一步 我们在Resources目录下,创建一个i18n的包,然后创建三个国际化的properties配置文件
接下来我们随便点进一个国际化配置文件,这里我点击进入login.properties中,然后可以点击Resources Bundle进入,如下
第二步 SpringBoot自动配置好了管理国际化资源的文件的组件,即ResourceBundleMessageSource,所以我们只要在properties配置文件中启用指定国际化文件就可以了,配置如下
第三步 去页面获取国际化的值,我们在HTML中使用Thymeleaf语法进行获取
第四步 现在我们已经设置好了国际化,怎么测试呢?我们可以切换浏览器国际化信息用进行测试,项目会自动检测浏览器语言环境,然后更换,我这里使用Chrome举例,点开Chrome的设置->高级,然后更换,如下http://localhost:8080/index.html?l=zh_CN和http://localhost:8080/index.html?l=en_US
登录进入主页 我们在登录页面的内容如下,有几个输入框,用来输入账号和密码的,然后我们写入之后发送请求,请求的接口是/user/login
拦截器 我们弄好了登录,这个时候就会想,如果我们不通过正常的登录,而是直接通过主页的连接进入到主页,这样子我们的登录界面还有什么意义呢?所以这里我们需要对所有请求进行拦截,写一个LoginHandlerInterceptor实现HandlerInterceptor的接口的拦截器
用户列表功能 用户列表的功能效果如下,我们可以显示用户的信息,然后进行增删改查的基本操作,所以我们需要创建Dao层和实体类,代码内容如下
1
2
3
4
5
6
7
8
9
10
11
12
13
14
15
16
17
18
19
20
21
22
23
24
25
26
27
28
29
30
31
32
33
34
35
36
37
import com.example.demo.Entities.Department; import org.springframework.stereotype.Repository; import java.util.Collection; import java.util.Map; import java.util.HashMap; /** * @program: demo * @description: * @author: DBC * @create: 2020-02-24 22:54 **/ @Repository public class DepartmentDao { private static Map<Integer, Department> departments = null; static{ departments = new HashMap<Integer, Department>(); departments.put(101, new Department(101, "D-AA" )); departments.put(102, new Department(102, "D-BB" )); departments.put(103, new Department(103, "D-CC" )); departments.put(104, new Department(104, "D-DD" )); departments.put(105, new Department(105, "D-EE" )); } public Collection<Department> getDepartments return departments.values(); } public Department getDepartment(Integer id){ return departments.get(id); } }
1
2
3
4
5
6
7
8
9
10
11
12
13
14
15
16
17
18
19
20
21
22
23
24
25
26
27
28
29
30
31
32
33
34
35
36
37
38
39
40
41
42
43
44
45
46
47
48
49
50
51
52
53
54
55
56
57
import com.example.demo.Entities.Department; import com.example.demo.Entities.Employee; import org.springframework.beans.factory.annotation.Autowired; import org.springframework.stereotype.Repository; import java.util.Collection; import java.util.Map; import java.util.HashMap; /** * @program: demo * @description: * @author: DBC * @create: 2020-02-24 22:56 **/ @Repository public class EmployeeDao { private static Map<Integer, Employee> employees = null; @Autowired private DepartmentDao departmentDao; static{ employees = new HashMap<Integer, Employee>(); employees.put(1001, new Employee(1001, "E-AA" , "aa@163.com" , 1, new Department(101, "D-AA" ))); employees.put(1002, new Employee(1002, "E-BB" , "bb@163.com" , 1, new Department(102, "D-BB" ))); employees.put(1003, new Employee(1003, "E-CC" , "cc@163.com" , 0, new Department(103, "D-CC" ))); employees.put(1004, new Employee(1004, "E-DD" , "dd@163.com" , 0, new Department(104, "D-DD" ))); employees.put(1005, new Employee(1005, "E-EE" , "ee@163.com" , 1, new Department(105, "D-EE" ))); } private static Integer initId = 1006; public void save(Employee employee){ if (employee.getId() == null){ employee.setId(initId++); } employee.setDepartment(departmentDao.getDepartment(employee.getDepartment().getId())); employees.put(employee.getId(), employee); } //查询所有员工 public Collection<Employee> getAll return employees.values(); } public Employee get(Integer id){ return employees.get(id); } public void delete(Integer id){ employees.remove(id); } }
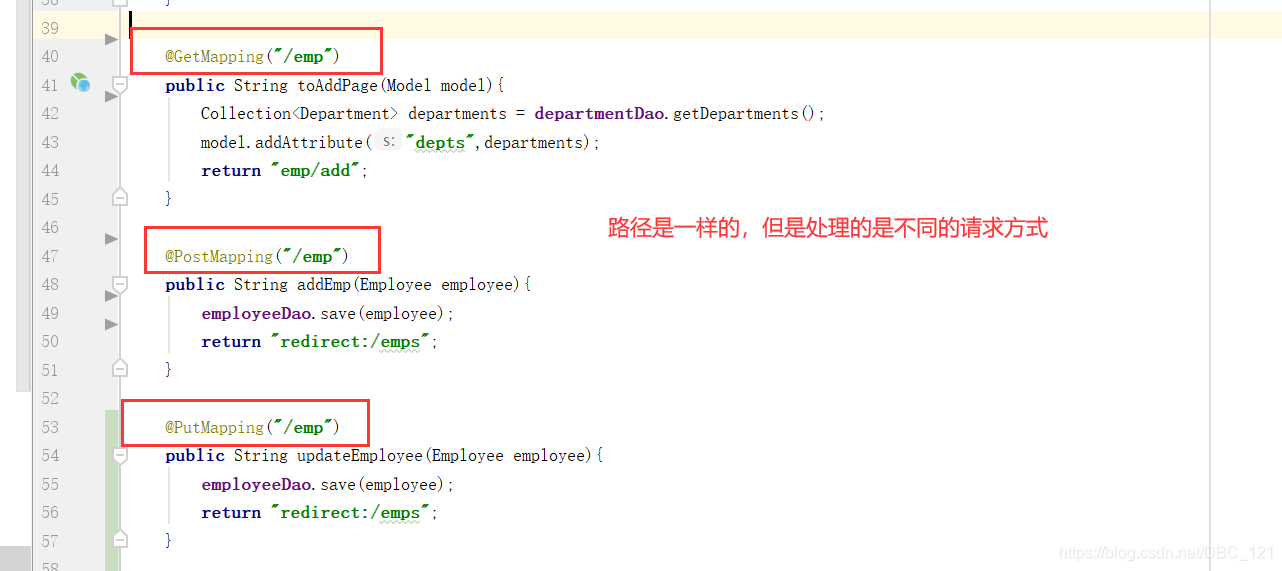
1
2
3
4
5
6
7
8
9
10
11
12
13
14
15
16
17
18
19
20
21
22
23
24
25
26
27
28
29
30
31
32
33
34
35
36
37
38
39
40
41
42
43
44
45
46
47
48
49
50
51
52
53
54
55
56
57
58
59
60
61
62
63
64
65
66
67
68
69
70
71
72
73
74
75
76
77
78
79
80
81
82
83
84
85
86
87
88
89
import com.example.demo.Dao.DepartmentDao; import com.example.demo.Dao.EmployeeDao; import com.example.demo.Entities.Department; import com.example.demo.Entities.Employee; import org.springframework.beans.factory.annotation.Autowired; import org.springframework.stereotype.Controller; import org.springframework.ui.Model; import org.springframework.web.bind.annotation.*; import java.util.Collection; /** * @program: demo * @description: * @author: DBC * @create: 2020-02-24 23:14 **/ @Controller public class EmployeeController { @Autowired EmployeeDao employeeDao; @Autowired DepartmentDao departmentDao; //查询所有员工返回列表页面 @GetMapping("/emps" ) public String list(Model model){ Collection<Employee> employees = employeeDao.getAll(); //放在请求域中 model.addAttribute("emps" ,employees); // thymeleaf默认就会拼串 // classpath:/templates/xxxx.html return "emp/list" ; } //来到员工添加页面 @GetMapping("/emp" ) public String toAddPage(Model model){ //来到添加页面,查出所有的部门,在页面显示 Collection<Department> departments = departmentDao.getDepartments(); model.addAttribute("depts" ,departments); return "emp/add" ; } //员工添加 //SpringMVC自动将请求参数和入参对象的属性进行一一绑定;要求请求参数的名字和javaBean入参的对象里面的属性名是一样的 @PostMapping("/emp" ) public String addEmp(Employee employee){ //来到员工列表页面 System.out.println("保存的员工信息:" +employee); //保存员工 employeeDao.save(employee); // redirect: 表示重定向到一个地址 /代表当前项目路径 // forward: 表示转发到一个地址 return "redirect:/emps" ; } //来到修改页面,查出当前员工,在页面回显 @GetMapping("/emp/{id}" ) public String toEditPage(@PathVariable("id" ) Integer id,Model model){ Employee employee = employeeDao.get(id); model.addAttribute("emp" ,employee); //页面要显示所有的部门列表 Collection<Department> departments = departmentDao.getDepartments(); model.addAttribute("depts" ,departments); //回到修改页面(add是一个修改添加二合一的页面); return "emp/add" ; } //员工修改;需要提交员工id; @PutMapping("/emp" ) public String updateEmployee(Employee employee){ System.out.println("修改的员工数据:" +employee); employeeDao.save(employee); return "redirect:/emps" ; } //员工删除 @DeleteMapping("/emp/{id}" ) public String deleteEmployee(@PathVariable("id" ) Integer id){ employeeDao.delete(id); return "redirect:/emps" ; } }
这里顺便说一下,我们在提交日期格式的字符串的时候,SpringBoot有着自己默认的字符串转换日期格式的方法,而这个默认方法是需要日期通过“/”进行分离的,如果我们先想要通过“-”进行分离,那么我们还是需要在主配置文件中设置日期格式的配置,如下
HiddenHttpMethodFilter
SpringMVC中配置HiddenHttpMethodFilter;(SpringBoot自动配置好的)
页面创建一个post表单
创建一个input项,name=”_method”;值就是我们指定的请求方式
下一篇 这里我们大致上是已经将SpringBoot开发流程走了一遍,不过还有一些web开发相关的操作需要了解,比如错误请求等等,将在下一篇博文中进行讲解。
Author:
DengBoCong
Permalink:
http://dengbocong.cn/Spring-Boot/22741562e341/
License:
Licensed under the Apache License, Version 2.0 (the "License")
Slogan:
Stay hungry, Stay foolish.